News
Hardness of metal materials
Release time:
2025/08/25
It refers to the material's ability to resist local deformation, especially plastic deformation, indentation or scratching. It is an indicator of the hardness of a material.
According to different testing methods, hardness is divided into three types.
①Scratch hardness. This is primarily used to compare the hardness of different minerals. The method involves using a rod with one hard end and one soft end. The material being tested is scratched along the rod, and the location of the scratch determines the hardness of the material. Qualitatively speaking, scratches made by hard objects are longer, while scratches made by soft objects are shorter.
②Indentation hardness. Primarily used for metal materials, this method involves pressing a specified indenter into the material under test with a certain load. The degree of local plastic deformation on the surface of the material is used to compare the softness and hardness of the material under test. Due to differences in the indenter, load, and load duration, there are several types of indentation hardness, primarily Brinell hardness, Rockwell hardness, Vickers hardness, and microhardness.
③Rebound hardness. Mainly used for metal materials, the method is to make a special small hammer fall freely from a certain height to impact the sample of the material being tested, and the hardness of the material is determined by the amount of strain energy stored (and subsequently released) by the sample during the impact (measured by the rebound height of the hammer).
The most common Brinell hardness, Rockwell hardness and Vickers hardness of metal materials belong to indentation hardness. The hardness value indicates the ability of the material surface to resist plastic deformation caused by another object pressing into it. The rebound method (Shore and Leeb) measures hardness. The hardness value represents the magnitude of the metal's elastic deformation function.
Brinell Hardness
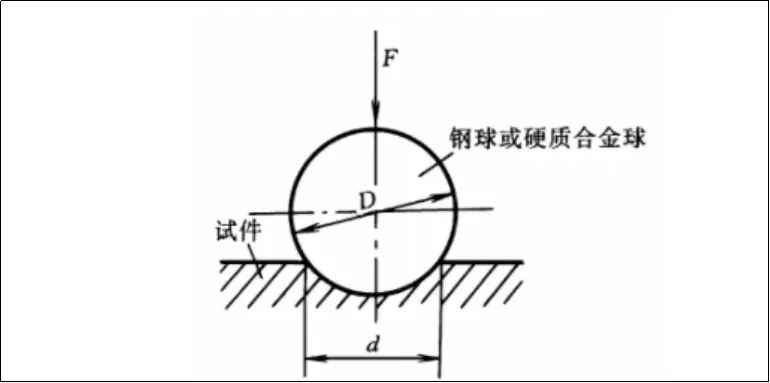
A hardened steel ball or carbide ball with a diameter of D is used as the indenter. The test force F is applied to the specimen surface. After a specified holding time, the test force is removed, resulting in an indentation with a diameter of d . The test force is divided by the surface area of the indentation to obtain the Brinell hardness value, represented by the symbols HBS or HBW.

The difference between HBS and HBW lies in the indenter. HBS indicates a hardened steel ball indenter and is used to measure materials with a Brinell hardness value below 450, such as mild steel, gray cast iron, and non-ferrous metals. HBW indicates a carbide indenter and is used to measure materials with a Brinell hardness value below 650.
For the same test block, when other test conditions are exactly the same, the two test results are different. The HBW value is often greater than the HBS value, and there is no quantitative pattern to follow.
The Brinell hardness measurement method is applicable to cast iron, non-ferrous alloys, and various annealed and tempered steels. It is not suitable for measuring samples or workpieces that are too hard, too small, too thin, or that do not allow large indentations on the surface.
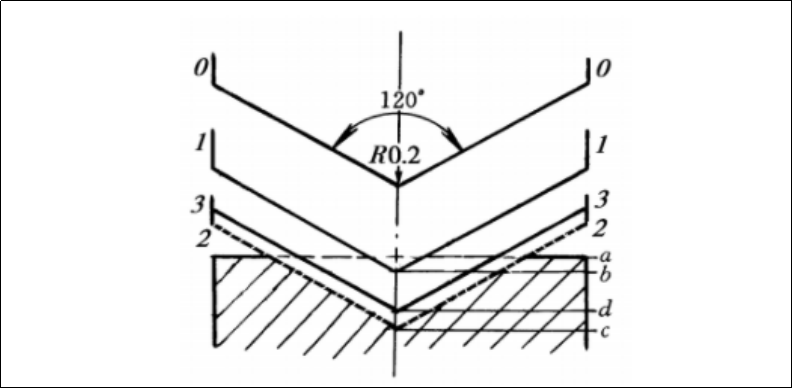
A diamond cone with a 120° apex angle or a hardened steel ball is used as an indenter in conjunction with a load. The specimen is pressed into place under the action of an initial load of 10 kgf and a total load of 60, 100 or 150kgf (i.e., initial load plus main load). After the total load is applied, the hardness is expressed by the difference between the indentation depth when the main load is removed but retained and the indentation depth under the action of the initial load.

|
hardness symbol |
Indenter type |
Total test force F/N ( kgf ) |
hardness scope |
Application Examples |
|
GAME |
120 ° diamond cone |
588.4(60) |
20~88 |
Cemented carbide, carbide, Shallow surface hardened steel, etc. |
|
HRB |
Ø1.588mm Hardened steel balls |
980.7(100) |
20~100 |
Annealed, normalized steel, aluminum alloy Gold, copper alloy, cast iron |
|
HRC |
120 ° diamond cone |
1471(150) |
20~70 |
Quenched steel, quenched and tempered steel, deep Layer of case-hardened steel |
The HRC scale has a usage range of 20 to 70 HRC. When the hardness value is less than 20 HRC, the cone of the indenter is pressed too deeply, resulting in decreased sensitivity. In this case, the HRB scale should be used instead. When the sample hardness is greater than 67 HRC, the pressure on the tip of the indenter is too great, which can easily damage the diamond and significantly shorten the life of the indenter. Therefore, the HRA scale should generally be used instead.
The Rockwell hardness test is simple, quick, and produces a small indentation, making it suitable for testing finished surfaces and hard, thin workpieces. However, due to the small indentation, the hardness value may fluctuate significantly for materials with uneven structure and hardness, making it less accurate than the Brinell hardness test. The Rockwell hardness test is used to measure the hardness of steel, nonferrous metals, cemented carbide, and other materials.
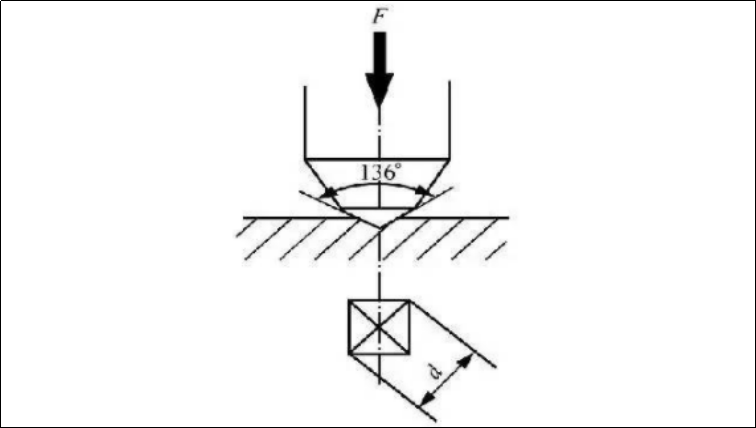
The Vickers hardness measurement principle is similar to that of the Brinell hardness. A diamond square pyramid indenter with a 136° angle between its faces is used to press into the material's surface with a specified test force, F. The force is maintained for a specified time, then removed. The hardness value is expressed as the average pressure per unit surface area of the square pyramid indenter, symbolized by HV.

Vickers hardness has a wide measurement range and can measure materials with a hardness range of 10~1000HV. It has a small indentation and is generally used to measure thinner materials and surface hardening layers such as carburizing and nitriding.
Leeb Hardness
A tungsten carbide ball with a certain mass is used to impact the specimen surface with a certain force, which then rebounds. The rebound speed varies depending on the hardness of the material. A permanent magnet is mounted on the impact device. As the impact body moves up and down, its peripheral coils induce an electromagnetic signal proportional to the speed. This signal is then converted electronically into a Leeb hardness value, symbolized as HL.
The Leeb hardness tester does not require a workbench. Its hardness sensor is as small as a pen and can be operated directly by hand. It can easily detect large and heavy workpieces or workpieces with complex geometric dimensions.
Another advantage of Leeb hardness is that it causes minimal damage to the product surface and can sometimes be used as a non-destructive test. It is unique in its ability to test hardness in all directions, in narrow spaces, and on special parts.
keywords
Previous Page
Previous Page:
Latest News
Contact Information
Tel: +86-18861298766
E-mail: jeni@vellfire-tools.com
Whatsapp:8618861298766
Address: No. 156, Nanxi Road, Xinbei District, Changzhou City (Wilfa Recutting Milling Cutter and High Efficiency Drill Wholesale)


Copyright© 2023 Jiangsu Vellfire Precision Alloy Co., Ltd. All Rights Reserved


